Front-End Web & Mobile
Integrating Amazon Cognito User Pools with API Gateway
Introduction
In April, we launched the Beta version of a new Amazon Cognito feature called Amazon Cognito User Pools. The user pools feature makes it easy for developers to add sign-up and sign-in functionality to web and mobile applications. In this blog post we will walk through how to integrate Amazon Cognito User Pools with Amazon API Gateway. It’s a assumed that you have a basic understanding of API Gateway and the API Gateway’s custom authorizer.
Scenarios for integrating Amazon Cognito User Pools with API Gateway
After the successful user authentication in your mobile or web application, your application will need to perform operations in the context of that user. For that you need a back-end application running on your server. In this post, we walk through Amazon Cognito User Pools and API Gateway integration in the context of a Notes application and a service that lets users create, retrieve, and delete notes.
In order to provide a ‘Notes Service’, you first require sign-up and sign-in functionality for your web or mobile application. This functionality can be implemented using Amazon Cognito User Pools. Additionally, you also expose an API for the Notes service though API Gateway. This API creates, retrieves, and deletes notes for an authenticated user. You also must implement authorization in your API so that you can identify the authenticated user and perform operations in the context of that user, such as Create Note and Delete Note.
After a user signs in successfully to your Notes application, Amazon Cognito User Pools returns an ID and Access Token to your app for the authenticated user. The Access Token can then be used to authorize API invocations through API Gateway using the API Gateway’s custom authorizer. For more information on tokens, see Using Tokens with Amazon Cognito User Pools.
Develop a sample Notes Service using AWS Lambda and API Gateway
The following steps describe how to develop the Notes service and its integration with API Gateway and Amazon Cognito User Pools. If you are familiar with API Gateway, you can skim through this section without creating an actual API.
1. Create a ‘Notes’ table that stores notes for your users in Amazon DynamoDB. The primary partition key for the table will be a ‘userId’ string, and the primary sort key will be a ‘noteId’ string. The userId is a globally unique identifier of an authenticated user in your user pool. The noteId is a unique ID associated with each note created by the user.
2. Create a new AWS Lambda function, called ‘dynamodb_manager’, using a Lambda blueprint, ‘simple-mobile-backend’. Choose the Lambda function role with proper permissions. We will use this function in API Gateway to perform operations against the ‘Notes’ table.
3. Create an API named ‘NotesService’ in API Gateway. Create a ‘/notes’ resource with a ‘POST’ method. For Integration Type, choose Lambda function and choose ‘dynamodb_manager’ as the Lambda function.
4. Create a ‘NoteCreateModel’ model in your ‘NotesService’ API and add it to a method request, as follows:
{
  "title": "Note Create Model",
  "type" : "object",
  "properties" : {
    "noteid" : {
       "type" : "string"
    },
    "note" : {
      "type" : "string"
    }
   },
  "required" : ["noteid", "note"]
}
This defines the input for a POST method for a ‘/notes’ resource. In our model, we accept a ‘note’ and ‘noteId’ pair to create a note for a user. The other information we need to create a note for a user is a userid. We will get the userid from the access token which will be passed in an ‘Authorization’ header to your API.
6. Add the following body mapping template to your integration request.
#set($inputRoot = $input.path('$'))
{
  "operation": "create",
  "payload": {
      "Item" : {
          "userid" : "$context.authorizer.principalId",
          "noteid" : "$inputRoot.noteid",
          "note" : "$inputRoot.note"}
  },
  "tableName" : "Notes"
}
This invokes the ‘dynamodb_manager’ Lambda function and creates a note in the ‘Notes’ table. Notice how we retrieve the userid here: ‘$context.authorizer.principalId’ will return the globally unique identifier for an authenticated user.
7. Create a new model ‘Success’ and attach it to your method response, as follows:
{
  "$schema" : "http://json-schema.org/draft-04/schema#",
  "title" : "Success Schema",
  "type" : "object",
  "properties" : {
    "message" : { "type" : "string" }
  }
}
8. Create a body mapping template in your integration response, as follows:
#set($inputRoot = $input.path('$'))
{
  "message" : "Note created"
}
This is the static response you will send to the application each time a note is successfully created. You can create additional body mapping templates to map errors.
Develop a Custom Authorizer for Amazon Cognito User Pools
After your API is created, you need to implement a custom authorizer for your API that will ensure that a request is coming from an authenticated user of your application. If it’s a valid access token, we will generate a policy against a userId, which is a unique identifier (UUID) for a user. You can then use ‘$context.authorizer.principalId’ in your API and get the userId value.
1. Download the blueprint for custom authorizer for Amazon Cognito User Pools
2. Unzip the file and modify the following variables with your userPoolId and region in the ‘authorizer.js’ file, as follows:
var userPoolId = ‘{REPLACE_WITH_YOUR_POOL_ID}’;
var region = ‘{REPLACE_WITH_YOUR_REGION}’;
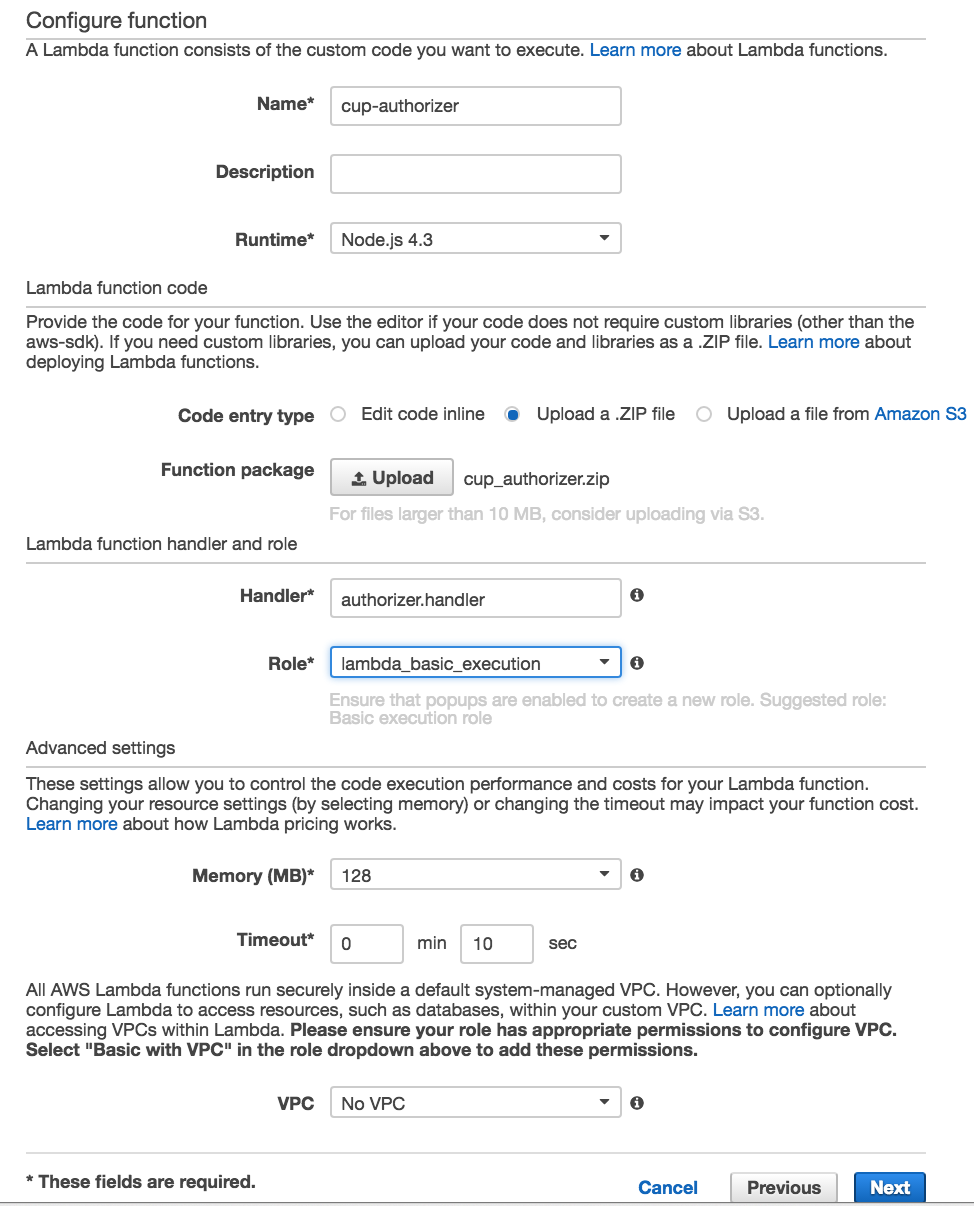
3. Zip all the files again, name the .zip file cup_authorizer.zip
, and create a Lambda function with that .zip file. Make sure that you only zip the inner files (authorizer.js and node_modules); do not zip the outer directory.
4. Choose Node.JS 4.3 as the Runtime for the Lambda function. For Handler, choose authorizer.handler.
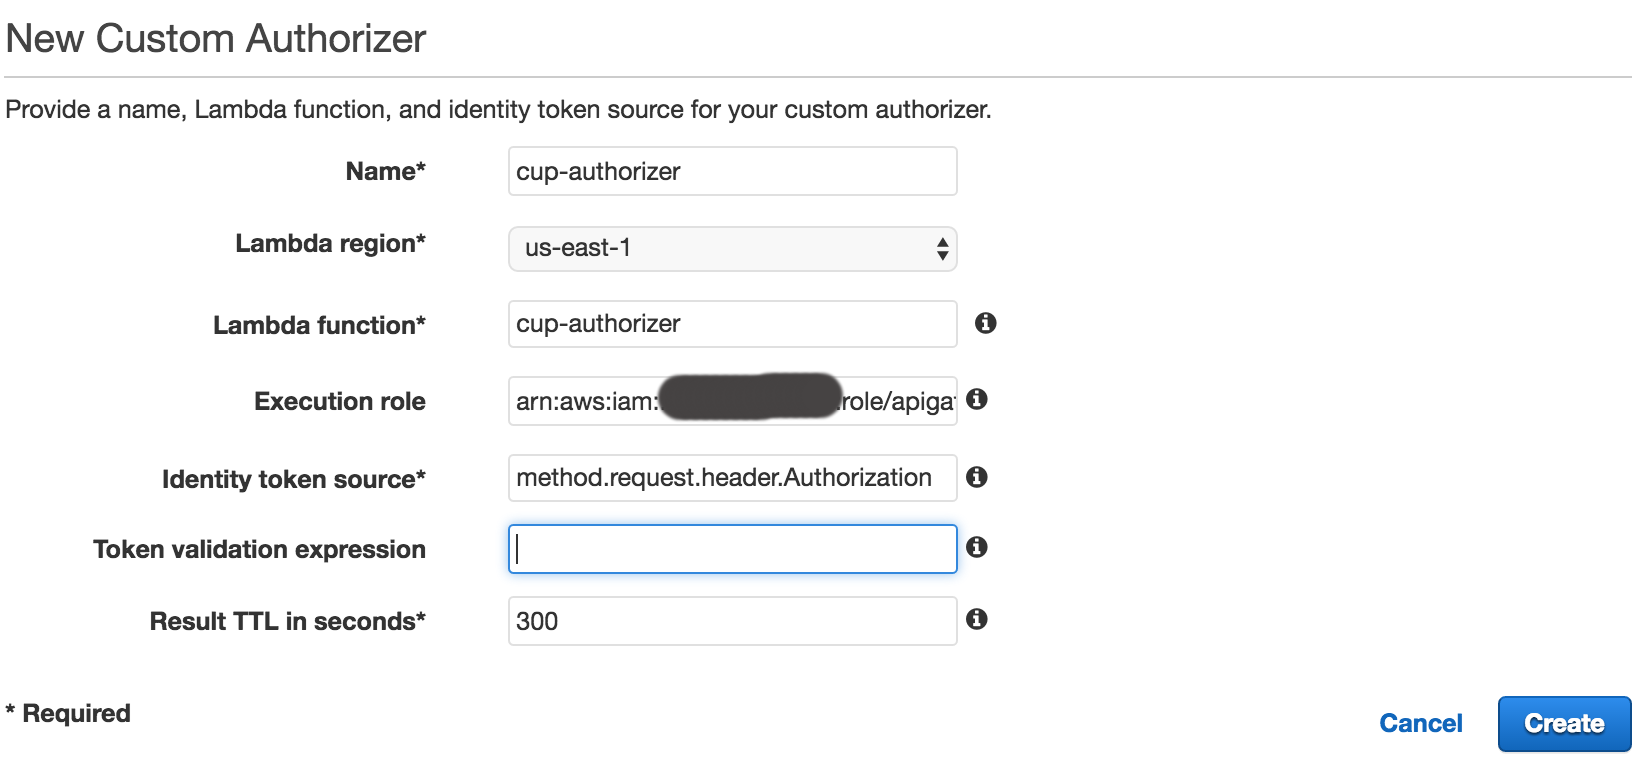
5. Create a custom authorizer in your API, as shown next.
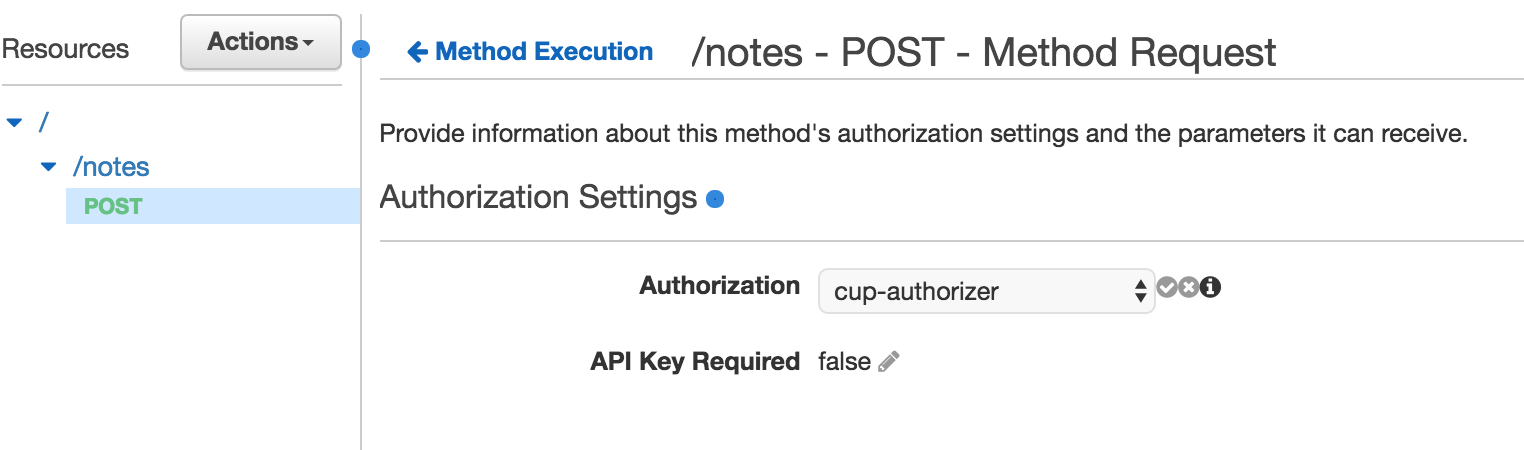
6. Now attach the authorizer in Method Request, as shown next.
7. Deploy the API. You can now test the API. If a valid Access Token for your user pool is passed to an API, the API will create a note in a DynamoDB table for that user. Otherwise, the API will throw an unauthorized message back to the application. Here’s how your request would look:
Endpoint: {invokeUrlForYourAPI}/notes
Http Method : POST
Headers
Authorization : {Access Token of a user from your user pool}
Content-Type : application/json
Body
{
  "noteid" : "note1",
  "note" : "my first note"
}
This should create a note in DynamoDB for an authenticated user. If you pass an invalid Access Token or the Access Token is expired, a custom authorizer will throw an unauthorized message (401) back to the client.
Understanding the code
It is important to understand the code in the ‘authorizer.js’ file if you choose to make any further modifications.
1. The following packages must be installed and used in your Lambda function:
var jwt = require('jsonwebtoken');
var request = require('request');
var jwkToPem = require('jwk-to-pem');
2. Download the JSON Web Key Set (JWK Set) for your user pool and convert the keys to PEM format, as follows:
    var pems;

    if (!pems) {
    //Download the JWKs and save it as PEM
    request({
       url: iss + '/.well-known/jwks.json',
       json: true
     }, function (error, response, body) {
        if (!error && response.statusCode === 200) {
            pems = {};
            var keys = body['keys'];
            for(var i = 0; i < keys.length; i++) {
                //Convert each key to PEM
                var key_id = keys[i].kid;
                var modulus = keys[i].n;
                var exponent = keys[i].e;
                var key_type = keys[i].kty;
                var jwk = { kty: key_type, n: modulus, e: exponent};
                var pem = jwkToPem(jwk);
                pems[key_id] = pem;
            }
            //Now continue with validating the token
            ValidateToken(pems, event, context);
        } else {
            //Unable to download JWKs, fail the call
            context.fail("error");
        }
    });
    } else {
        //PEMs are already downloaded, continue with validating the token
        ValidateToken(pems, event, context);
    };
3. Validate the token, as follows:
function ValidateToken(pems, event, context) {

    var token = event.authorizationToken;
    //Fail if the token is not jwt
    var decodedJwt = jwt.decode(token, {complete: true});
    if (!decodedJwt) {
        console.log("Not a valid JWT token");
        context.fail("Unauthorized");
        return;
    }

    //Fail if token is not from your User Pool
    if (decodedJwt.payload.iss != iss) {
        console.log("invalid issuer");
        context.fail("Unauthorized");
        return;
    }

    //Reject the jwt if it's not an 'Access Token'
    if (decodedJwt.payload.token_use != 'access') {
        console.log("Not an access token");
        context.fail("Unauthorized");
        return;
    }

    //Get the kid from the token and retrieve corresponding PEM
    var kid = decodedJwt.header.kid;
    var pem = pems[kid];
    if (!pem) {
        console.log('Invalid access token');
        context.fail("Unauthorized");
        return;
    }

    //Verify the signature of the JWT token to ensure it's really coming from your User Pool

    jwt.verify(token, pem, { issuer: iss }, function(err, payload) {
      if(err) {
        context.fail("Unauthorized");
      } else {
        //Valid token. Generate the API Gateway policy for the user
        //Always generate the policy on value of 'sub' claim and not for 'username' because username is reassignable
        //sub is UUID for a user which is never reassigned to another user.

        var principalId = payload.sub;

        //Get AWS AccountId and API Options
        var apiOptions = {};
        var tmp = event.methodArn.split(':');
        var apiGatewayArnTmp = tmp[5].split('/');
        var awsAccountId = tmp[4];
        apiOptions.region = tmp[3];
        apiOptions.restApiId = apiGatewayArnTmp[0];
        apiOptions.stage = apiGatewayArnTmp[1];
        var method = apiGatewayArnTmp[2];
        var resource = '/'; // root resource
        if (apiGatewayArnTmp[3]) {
            resource += apiGatewayArnTmp[3];
        }

        //For more information on specifics of generating policy, see the blueprint for the API Gateway custom
        //authorizer in the Lambda console

        var policy = new AuthPolicy(principalId, awsAccountId, apiOptions);
        policy.allowAllMethods();

        context.succeed(policy.build());
      }
});
};
When you successfully return the policy from your Lambda function, you can then retrieve the userId value of an authenticated user in your API by using ‘$context.authorizer.principalId’. When you call context.fail(“Unauthorized”) from your function, it will send a 401 response back to the client. When you call context.fail(“error”), it should send a 500 response back to the client.
API Gateway’s Authorizer for Cognito User Pools
API Gateway has recently launched support for Cognito User Pool Authorizer. If you use Cognito User Pool Authorizer, you do not need to set up your own custom authorizer to validate tokens. Once your API methods are configured with Cognito User Pool Authorizer, you can pass unexpired ID Token in the Authorization header to your API methods. If it’s a valid ID Token for a user of your User Pool, you can then access all the claims of ID Token in your API using ‘$context.authorizer.claims’. For example ‘$context.authorizer.claims.email’ will return user’s email address and ‘$context.authorizer.claims.sub’ will return you user’s unique identifier. If the ID token is expired or is invalid, Cognito User Pool Authorizer will send Unauthorized (401) response to the caller.
We welcome your feedback on this feature in the Amazon Cognito forum.